Showing posts with label How-to. Show all posts

7.20.2012

10 Steps to Create Your Own Spa Day at Home + 17 Free Songs from Amazon!

10 Steps to Create Your Own Spa Day at Home


This will take some prep work on your part. So plan ahead the end result is so worth it. Just remember you deserve it. :)

1. Schedule some alone time without the kids. I know this step alone is performing magic but do not give up. Your day will come and when it does you'll have this nifty list to help you relax!

2. Before the actual day think about what you want to have on your spa day. A facial, mani, pedi or the whole pie? Whatever it may be a plan is needed. We have major relaxing to do. I'm going to go with a nice candle light bath in my hot (bath) tub, a pedi, and a facial. I usually do a conditioning treatment on my hair also. You just use a shower cap and your favorite conditioner. [Generously condition your hair and cover with the cap. Let set as long as desired. I leave it for an hour or more. Wash your hair and viola salon hair. ]

3. Now that you have an idea of what you want you can either go through your cabinets and pull out your expensive stuff you've saved since Christmas, use up some of those free samples, or make your own. I like to do all three. Gives me a chance to try some new things and feel all frugal. Here are links to my favorite concoctions. 


-Homemade Facial Scrubs
-Bath Salts
-Massage Oil
-Hand Cream
-Foot Soaks


4. You may want to pick up a few 'spa essentials' at the grocery store. Fruit, Tea, Croissants, and Chocolate definitely chocolate.  

5. Kick everyone out of the house. Close the blinds, pull the curtains, light scented candles, and start up this Free Relaxation & Meditation digital sampler.  Pull on your favorite comfy robe and apply your conditioning treatment and facial masks.

6. Pour yourself some tea, have a nice sandwich on your croissants, and dip the fruit in the chocolate. You could sit with your back against a massage pad and soak your feet while you enjoy your food.

7. Run a nice hot bubble bath, add flower pedals if you have them, and bath salts. Light candles and turn off the lights. Try not to fall asleep in the tub, it is dangerous. You could set a timer if you are alone just to be safe. 


8.  Once you have done all your soaking, salting, and conditioning its time to rinse. Lotion would be good at this point to hold in all the lovin' you just gave your skin. 


9. Next give yourself a nice pedicure from the lotion to the polish. I have all the essentials here at home and I can get a pedi done without the cost. You can too with very little investment. 


10. To end your day curl up with a good book or seeing as the children and hubby are away... SLEEP, yes...sleep is good. ;-)

I hope you enjoy your Homemade Spa Day and don't forget to download your free Amazon music sampler here with 17 songs!

6.26.2012

Summer Veggie Stack

Have you been looking for a new way to cook up zucchini and crook neck squash? Well this is the dish for you! This is so delicious it makes me think of pasta while eating it. It tastes like something you would order at a fancy Italian restaurant. This is definitely a veggie filled treat! My 4 and 8 year old asked for seconds. I've made this dish twice since fine tuning it to my family's tastes. Keep reading to learn how to make this super EASY super PLEASING Summer Veggie Stack. 


INGREDIENTS:

1 Tbsp Vegetable Oil
1 medium Yellow Onion 
1 tsp Minced Garlic
1 medium Zucchini
1 medium Yellow Squash
1 medium Tater
1 medium Tomato
1 cup Shredded Cheddar Cheese
1 tsp Italian Seasoning
1 tsp Garlic Powder
Salt & Pepper to taste


DIRECTIONS:

 Preheat the oven to 400 degrees.


Finely dice the onion and add minced garlic. Saute both in a skillet with oil until softened. I use frozen onions so this step didn't take long for me. I'm guessing it would take around 5 minutes with fresh onions. :)


While the onion and garlic are sauteing, thinly slice the rest of the vegetables.


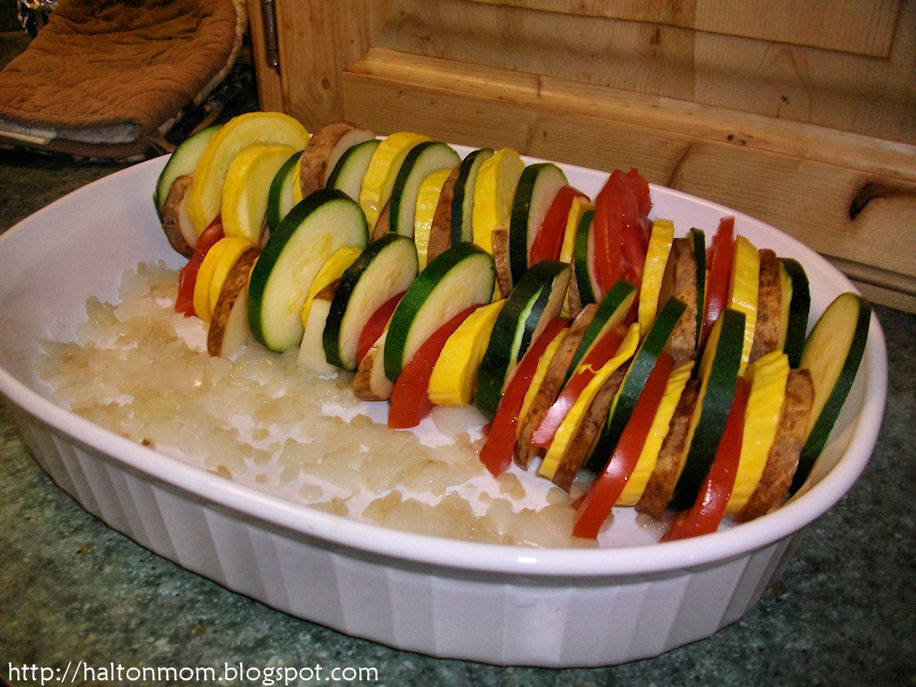
Prepare the inside of a square or round baking dish with oil or spray. Spread the softened onion and garlic in the bottom of the dish. Stack the thinly sliced vegetables in the baking dish vertically, in an alternating pattern. After awhile I just shoved the slices in as you can see by the picture below, it will taste the same I assure you. LOL Sprinkle generously with salt, pepper, garlic powder, and Italian seasonings.

Cover the dish with foil and bake for 30 minutes. Remove the foil, top with cheese and bake for another 30 minutes or until the cheese is golden brown.

That's it! I let this cool on my stove top for about 10 minutes before serving. The first time we had this we ate it as a main dish with corn on the cob and garden green beans, it is just that good. The next night we used it as a side with bbq pork chops. Possibilities are endless. I just know this will replace a lot of those Ritz cracker filled squashed casseroles that seem to grow on trees this time of year. LOL I hope you enjoy it and if you do please pin and share with your friends.

Have a great day and thanks for reading! =o)

Hey don't forget to enter a giveaway or two while you are here. ;) 

6.19.2012

Buffy’s Steak and Shrimp Kabobs


How pretty are those? When I saw them on my sister's facebook wall I pounced on them for you all. They made my mouth water and I will be putting together my own batch asap. We didn't get a picture of them after they were done, but that is no surprise. I'm sure these do not last long! Here is the recipe for you to enjoy. Kabobs can be changed up from steak to chicken or pork. You could even  just do veggies its really up to you! Have fun with it. =)

Buffy’s Steak and Shrimp Kabobs

6 Sirloin Steak; Cut into Chunks
1 Bag Shrimp; Deveined, and Tails Removed
1 Package Whole Mushrooms
1 Package Small Tomatoes
3 Onions; Quartered and Separated
6 Green Peppers; Quartered
Grill Seasonings
Salt and Pepper to Taste
Sweet Baby Ray Sweet and Spicy

Preheat your outdoor grill. Prep your first six ingredients. After you are done cleaning, cutting, and chopping begin assembling your kabobs. The skewers used had four skewers on one handle. After you have your kabobs assembled, sprinkle each one with Grill Seasoning, Salt, and Pepper on both sides. Place kabobs directly onto grill. Baste with BBQ sauce. Cook for about 10 minutes baste and turn. Cook another 10 minutes. Until Shrimp is pink and Steaks are cooked to medium. Cooking times will vary depending on your steak preference.


Meat Doneness Temperatures For Steaks and Lamb

Medium-Rare 145 °F
Medium 155 °F
Medium-Well 165 °F
Well Done 170 °F

Alright folks that's it. I hope you enjoy this one! I want to say a HUGE thank you to Buffy for sharing with us. If you all are nice I may be able get more recipes from her! ;) So if you like it then you should put a pin on it. =)

Happy Grilling!

5.25.2012

Tutorial: Easy Cute No Heat Sock Curls


When I first joined Pinterest one of the things I wanted to learn about the most was new ways to fix my daughter's hair. We had done the ponytails, braids, and pigtails to death. And I didn't want to fry her hair with curling irons and flat irons. Early on I found some great tips on how to curl hair, without heat, with socks.  Best part, you should already have everything you need in your bathroom and sock drawer! We had to try it. We loved it and I thought my readers would too. So...ya interested? Good, lets get started. :)

Things you will need:
1. Freshly Shampooed Towel Dry/Wet Hair
2. 5-10 Dress Socks depending on how much hair you have to work with.
3. Curling Mouse, Gel, or Spray
4. Finishing or Hair Spray
5. Comb
6. Clips to hold hair up in sections. I used whatever I could find in the house. I think I used a pencil for one. ;)

After you've finally wrestled your child in and out of the shower make sure to dry the hair as much as possible with a towel. If the hair is too wet the curls won't hold. Okay now work some of the Curling Gel throughout the hair, scalp to tip. Now comb and divide the hair into sections, clipping each section up and away from the section you'll be working with first. Remember the bigger  sections will form more of a wave and the smaller sections produce a tighter curl.

Take your first section and comb it straight, take your first sock and wrap the hair keeping it flat and curling the tips under from tip to scalp. Make sure and tuck any loose ends in while your rolling or those pieces will not curl. Now have your child hold the wrapped hair and the sock down with their hand while you tie the ends of the sock together. It's okay if the sock knot is loose from the scalp and moves freely. Repeat this step with each section until your child's hair looks like the picture below. Now spray the knots with hair spray and tuck your kiddo into bed.
 In the morning the knots will have slipped out a little as they are slept on. No biggie, just untie the socks and pull your beautiful curls out one by one. Use your fingers to style the hair and spread the curls out evenly and around the face.  Spray the style with hair spray and your done.


You could also pull one side up with a bobbie pin, pull the sides up into a half pony, add a braided head band, or leave it loose like we did here.


If you need more help with this one here is a video from Babesinhairland.com on Pinterest. They have countless styles, tips, and videos to help you make your child over everyday!


I hope you have fun with this one we sure did. We still get a giggle using Daddy's old socks to fix her hair. :) Remember to like, share or pin this one if you enjoyed it, THANKS.
Have a great day!

Photobucket